

I wanted to add a laser module to my CNC router so that I could label parts as they were machined. The advantage to doing this on one machine is obviously reduced setup time.
The laser module I used was an ElksMaker 2300mW 445nm blue laser. I got this off ebay for ~$100NZD (70US) https://www.ebay.com/itm/445nm-2-3W-2300mW-Blue-Laser-Module-With-TTL-PWM-For-DIY-Laser-Cutter-Engraver/322382603217?ssPageName=STRK%3AMEBIDX%3AIT&_trksid=p2057872.m2749.l2649
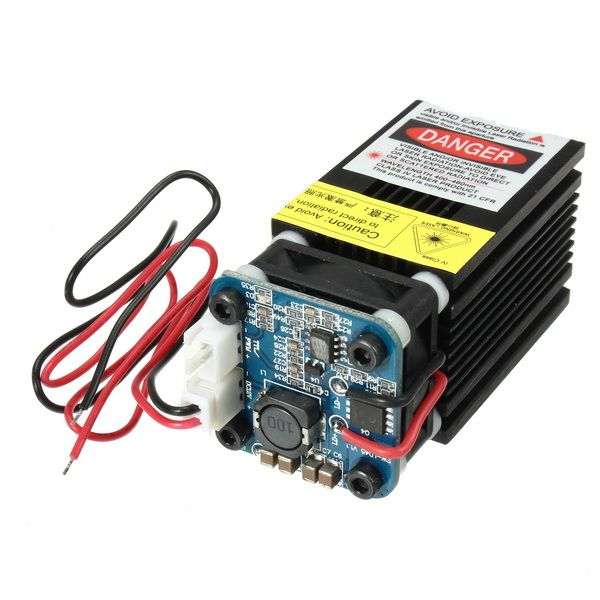
You could use a more powerful module, up to 15W for around $300 depending on what your intentions are.
Varitech has a good video on adding a laser module to a CNC router: https://www.youtube.com/watch?v=mZLO07CZD4s
Which helped me to get started. I made some important functional differences in the c
Varitech set the module up to activate for CCW rotation of the spindle and substituted M4 (M4 = start spindle CCW) codes and M5 (M5=Stop Spindle) codes for each up or down movement of the Z axis to activate or deactivate the laser. For my solution, I created new M codes to turn the laser on and off so that the configuration did not interfere with any spindle.
The laser module I am using can be controlled by a PWM signal, I won’t be using this as the module is already low power. For the time being, the intensity of the engraving will be regulated by adjusting the feed rate of the machine.
Safety
Use safety goggles when using lasers. Also ventilate the area properly. Please make sure that the bandwidth on the safety goggles covers the working band of your laser module.
If this experiment works out, I plan to add shielding around the head of the the laser https://jtechphotonics.com/?product=445nm-laser-shielding
And perhaps, active carbon filtration using the dust extractor blower.
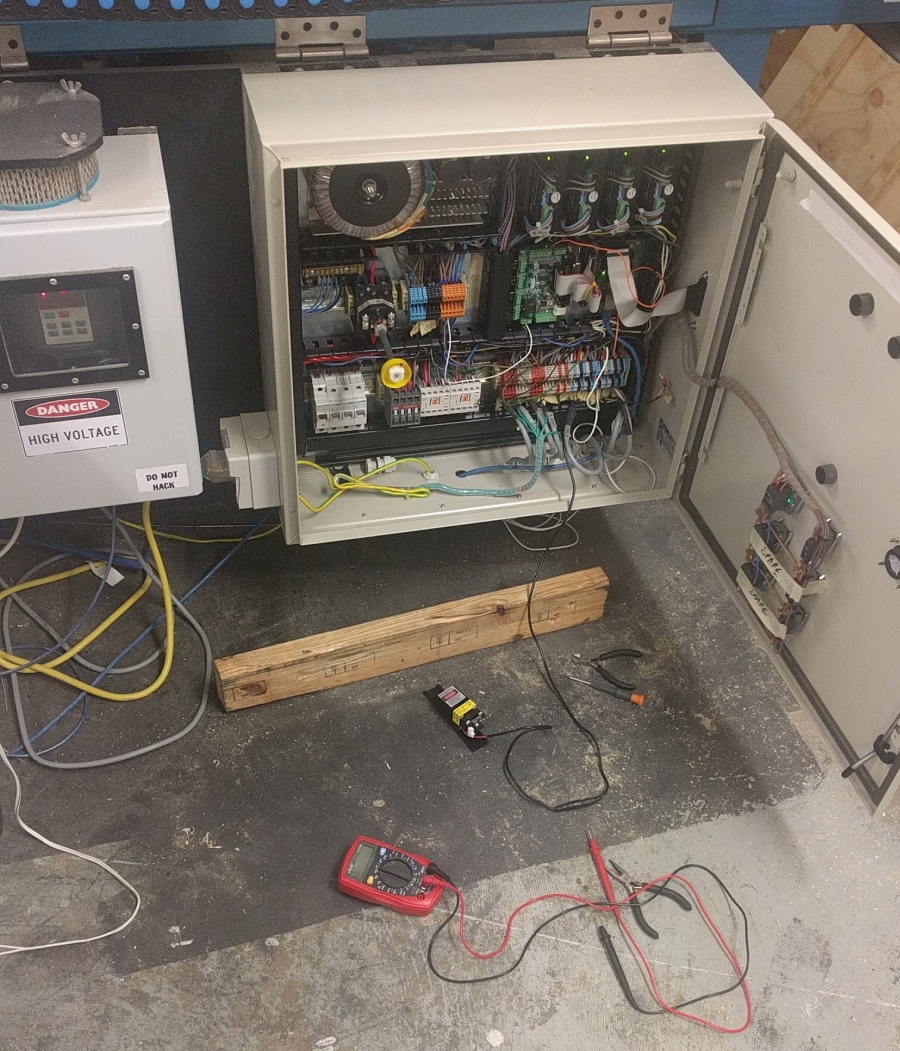
Wiring
To power the laser, I am using the onboard relay on the CNC controller board. Typically this is used to drive a spindle, but It is not being used in my case so it was free to provide power to the laser. As the relay switching is not instantaneous, the laser lags somewhat from the intended start time. In future, the power to the laser could be switched on by the relay and the laser ‘fired’ from another of the output pins.
The break out board I have is a: PMDX-122 the laser is wired in series with the relay and 12V source.

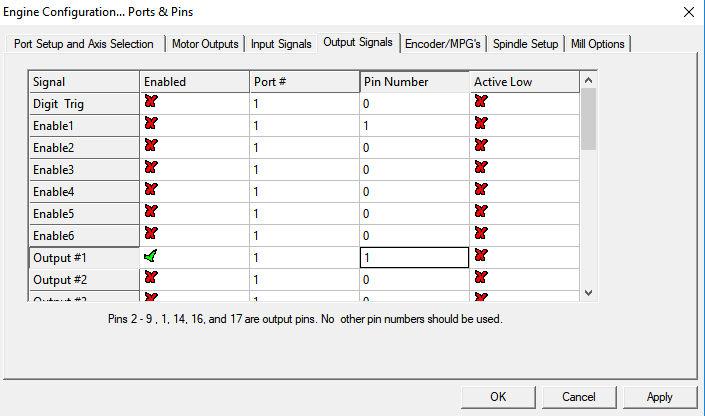
Configuration
In mach3, the output needs to be mapped to the correct pin. On this board the relay is activated by Pin 1.
Code
Mach3 has VBA support. This allows the user to write scripts and save them as macros. Macros can be called from GCODE by saving the macro as an “M##” file in the Mach3\macros\Mach3Mill directory.
Access the VB script editor through the menu shown below

Scripting is extremely powerful and useful. I found this video really helpful getting started: https://www.youtube.com/watch?v=J9r3aTRCEo
‘This script enables a laser to be switched on by calling M301 in the GCODE file.
‘’Output1’ must be mapped to ‘pin 1’ which has the relay for direct driving a spindle.
ActivateSignal(Output1)
‘This script enables a laser to be switched OFF by calling M302 in the GCODE file.
‘’Output1’ must be mapped to ‘pin 1’ which has the relay for direct driving a spindle.
DeactivateSignal(Output1)
Below is a simples GCODE program to test the laser
G54 F1000 (run in local co-ordinates at feedrate of 1000mm/min)
X0 Y0 (move to X0,Y0)
M301 (run script m301.m1s - Turn laser ON)
X50 Y0
X50 Y50
X0 Y50
X0 Y0
M302 (run script m302.m1s - Turn laser OFF)
M30 (Rewind)
Test
Results
Below are the results of the above video close up.

The smoke really effects the quality of the engraving by interfering with the beam. For the the second test I switched on the dust extractor faced the inlet toward the laser.
The artifacts from the delay in the relay switch time are quite noticable here. This is something to be improved on possibly by adding PWM or a solid state relay.
All in all, results were very good.
Video Walkthrough

Hello, I recently purchased a laser module that has it’s own power supply, I searched for info and came across this site optlasers.com/info/post/mach-3-configuration-for-engraving-laser-head when I fallowed these instructions the laser only came on briefly at the start then a couple of times briefly during my test. During my search for answers to this I stumbled across your site and video, very different setup. So if I am to understand correctly doing this setup your way I will have to edit the G code, in my case minus the laser power just the on off portion?
LikeLiked by 1 person
I guess it depends on the input signal required by your module. The issue with setting up the spindle configuration to drive the laser is that you cannot also have a spindle.
LikeLike
hi good afternoon
I have a CNC 6040 of router, and I want to set a laser from ebay, but I not sure how connect it to my machine I use USB version, and I have extra output for 4 axis available.
thanks<regards.
AR
LikeLike
Sorry I don’t know this machine. Do you have any general purpose input/output ports? What control software do you use?
LikeLike
I use Mach 3 for move the CNC, but I want to add laser, for cut mdf and acrylic, currently I found some lasers in ebay but the majority said that’s need input TTL or PWM connection, I m not sure how connect it, I can send you a picture of my machine.
thanks, Regards
LikeLike
I have a laser module wired to my controller and also running Mach 3, you will be using the TTL signal, this is essentially the same wiring as the PPM but not running your laser at full potential as the typical controller does not switch fast enough for the PPM to be used. There are many instructions available to show how to wire this via the TTL, a post processor is needed to turn on and off the laser between moves, mine is setup on the spindle pinouts and in the config in Mach 3.
LikeLike
Nunavsystems
But you know how connect in the cnc 6040.
thanks
LikeLike
Your controller will have pinouts for inputs and outputs, use the pinouts to configure Mach 3, it doesn’t matter what pin is used so as long as it is an “out” pin, it will be defined in the Mach 3 config settings.
LikeLike
So when I say “your controller” I don’t mean the controller box but rather the physical circuit board that processes the parallel port, or in your case the USB signal, you may need to add a plug on your box to support wiring of the laser.
Post a picture of the controller so we know what we are dealing with.
LikeLike
I cant add picture, do you know how I can attach it?
thanks, Regards.
LikeLike
Email cstewart000 at gmail
LikeLike
Send me a picture of it to here info@nunav.ca
LikeLike
Hey everyone, thanks for all the interest. I will think about doing a revised post with some new ideas. I have learnt a bit since I did this project the first time around.
LikeLike